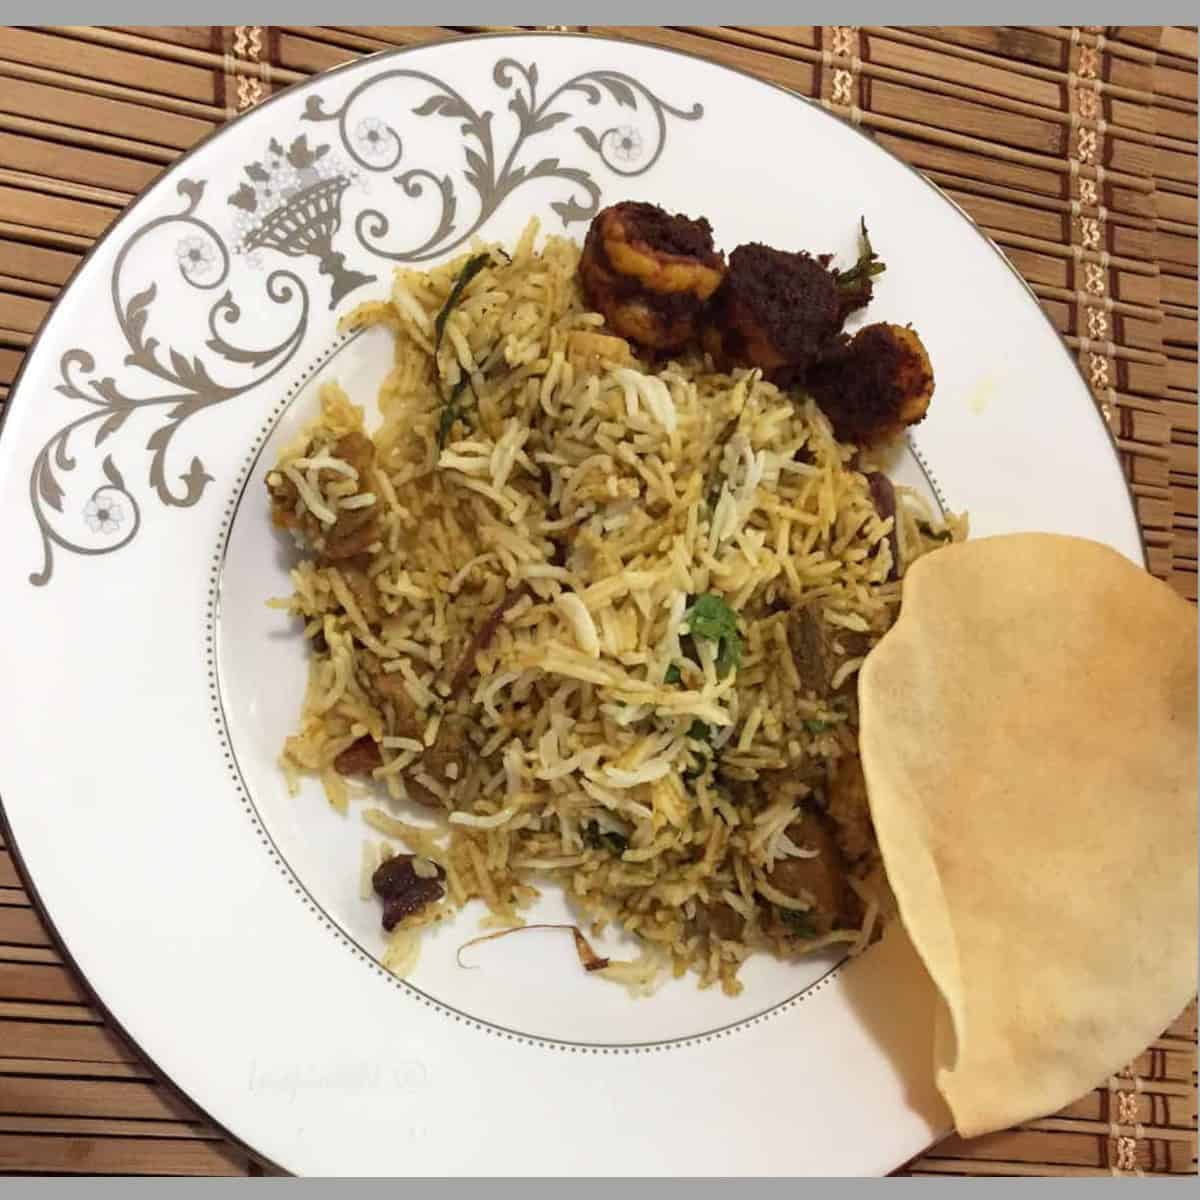
From the aromatic Hyderabadi dum biryani to the flavorful Malabar Mutton Biryani, every biryani has its own special twist. This layered Mutton Biryani Easy Recipe holds a special place in my heart; it's a taste of home, and a no-fail recipe that never lets me down. It's simple, reliable, and absolutely bursting with flavor. Let's dive into this family favorite, one that's sure to become a staple in your kitchen, too!
Jump to:
Why will you love this biryani?
- Easy to Make - This biryani is refreshingly simple to prepare, thanks to a straightforward layering method that skips the traditional dum (steam cooking). process. All you need to do is cook the rice and the mutton gravy separately, then layer and assemble them with flavorful garnishes, and easy even for a beginner cook
- Bursting with Flavor - Rich, aromatic, and deeply satisfying, this biryani delivers on every level. Made with tender goat meat or mutton, it's hard to go wrong; you can easily substitute lamb.
- Perfect for Special Occasions- Great for festival celebrations, weekend dinner, or treating loved ones, this dish makes a festive and feels both impressive and delicious.
- The Magic of Homemade - Homemade biryanis are always special; the layers of flavor, the warmth of home-cooked spices, and the personal touch make it far more memorable than any restaurant version.
- What can be served along - Serve this biryani with appetizers like fish cutlet Kerala style and sides like Chemmeen thengakothu (Spicy Shrimp roast), papad (fritters), and curd salad. Finish off with a nice dessert like pineapple pudding or matta rice payasam to leave your guests with a sweet memory of the feast.
Ingredients
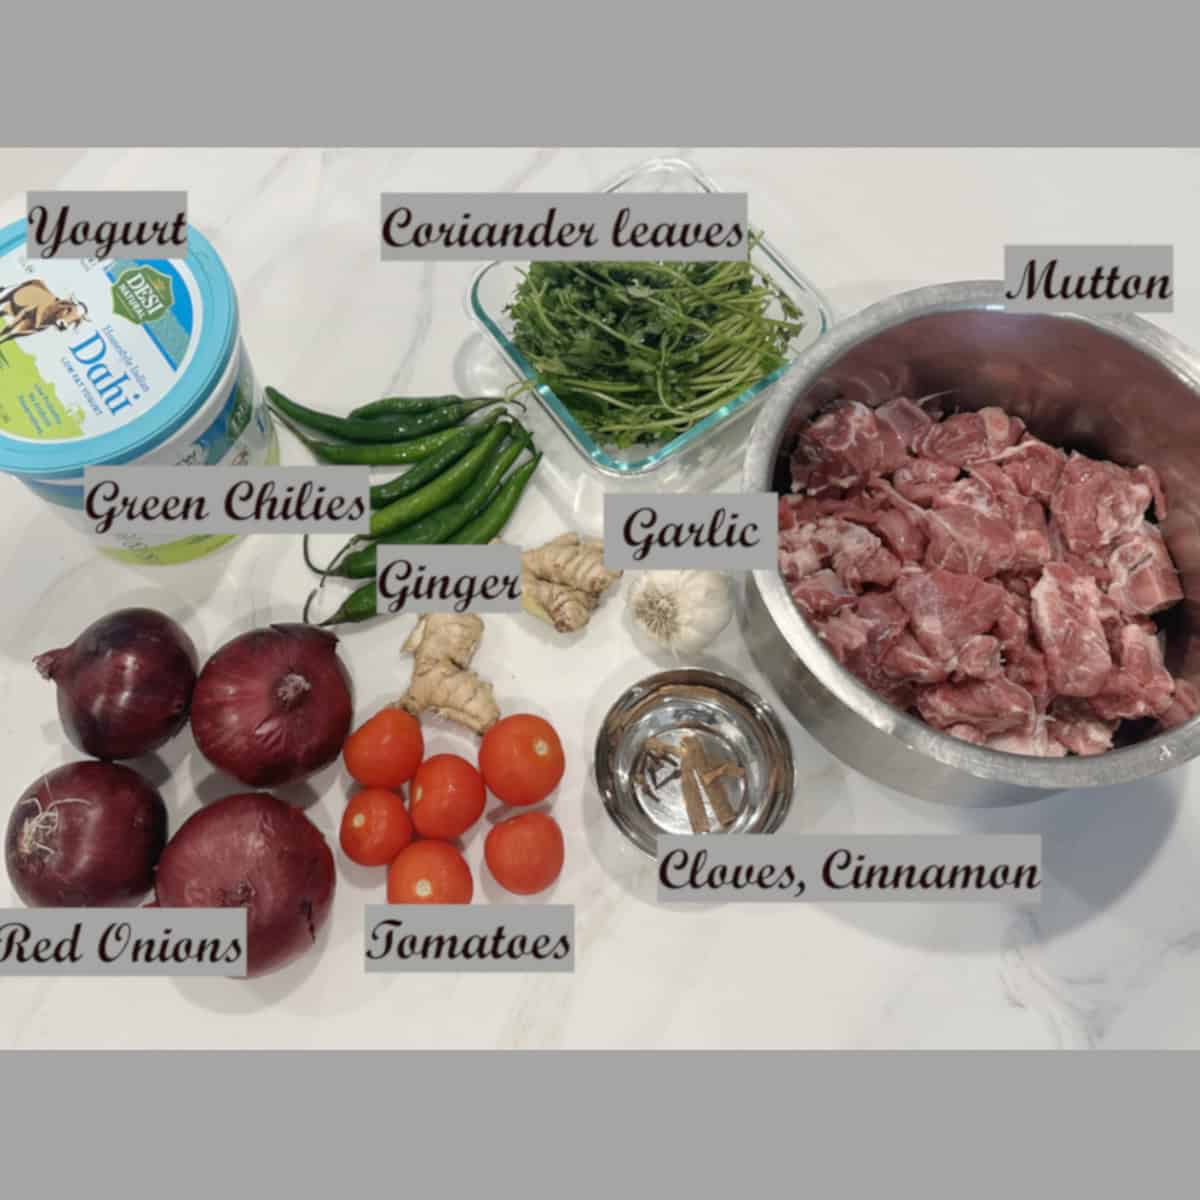
- For Meat marination and cooking
- Veggies - Onions, Garlic, Ginger, Green chilies, Coriander leaves
- Whole spices - Cinnamon, Cloves
- Gaot meat or mutton cleaned and cut into small pieces
- Yogurt, Ghee
- Spice powders - Red Chili powder, Turmeric, Coriander Powder, Biryani Masala, Garam masala
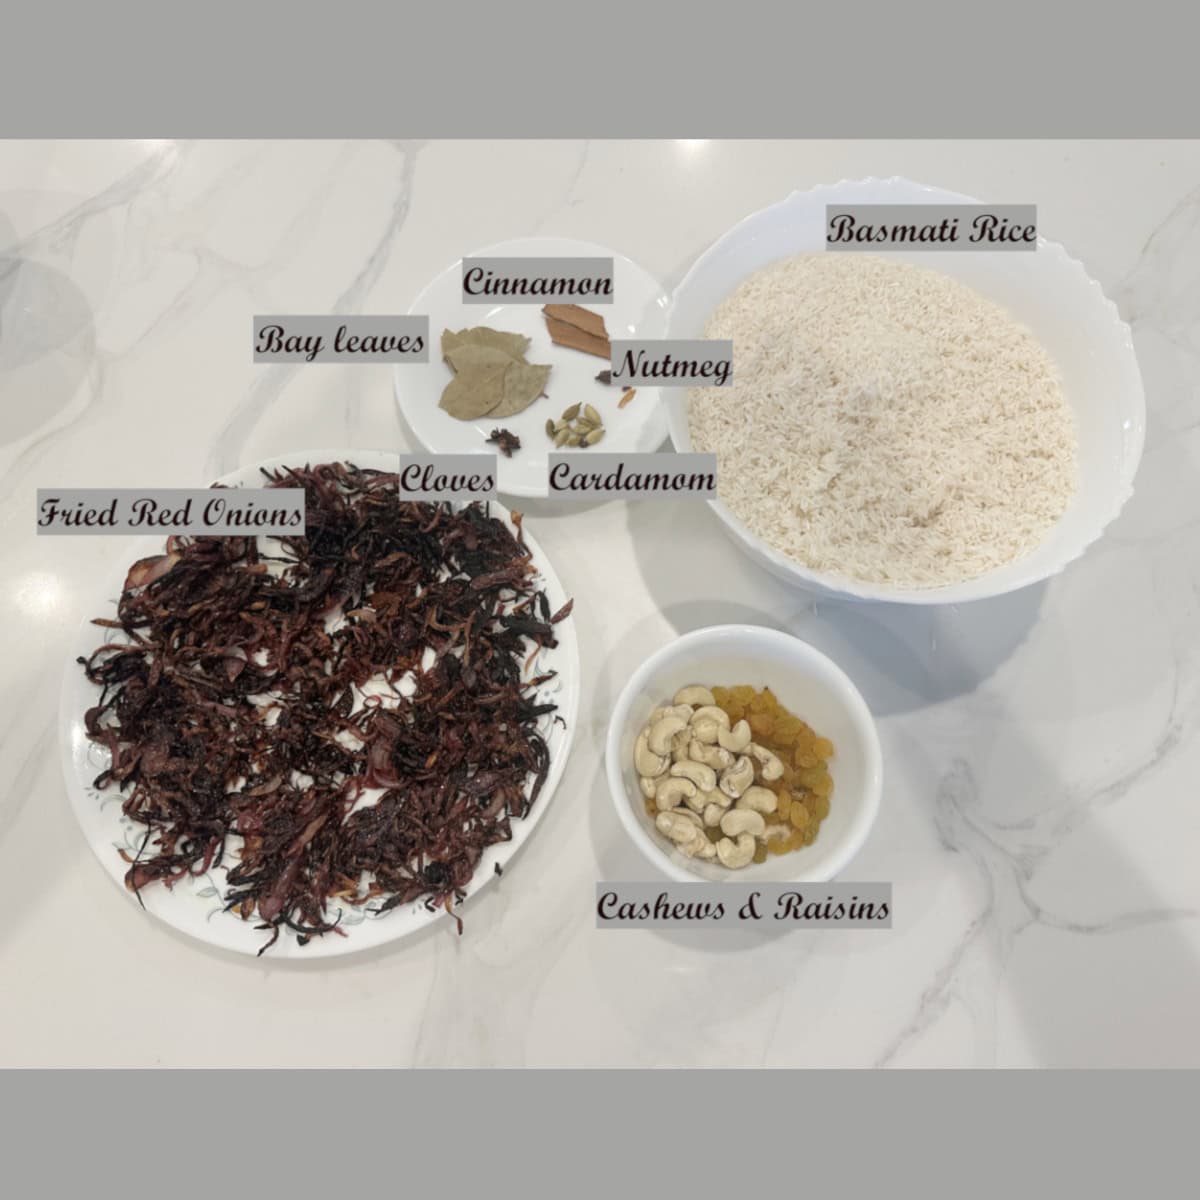
- For Rice preparation
- Whole spices - Bay leaves, Cinnamon, Cloves, Cardamom, Nutmeg
- Cashews and Raisins
- Fried Onions Browned and crisped
Mutton Biryani Easy Recipe - How to make?
The preparation begins with marinating the meat, which is then pressure-cooked until tender. Separately, garnishes like caramelized onions, nuts, and raisins are fried to perfection. The rice is sautéed with aromatic spices before being cooked. Finally, the biryani is assembled by layering the fragrant rice with the succulent meat, rich gravy, and garnishes, creating a dish that's as flavorful as it is comforting.
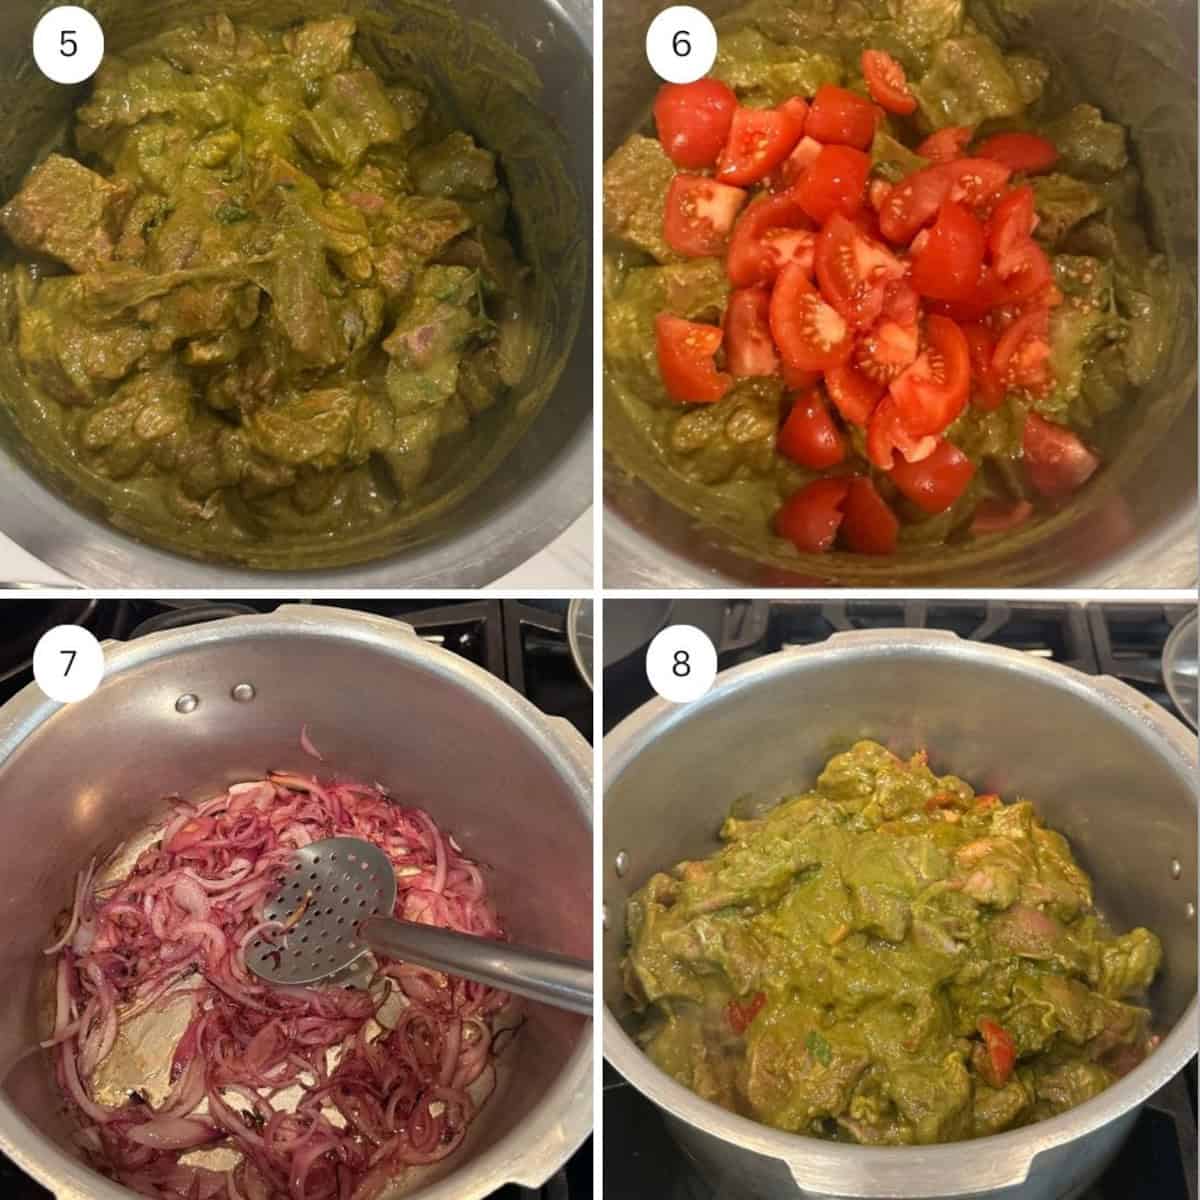
Marinating the meat is a crucial first step. Steps 1- 4)The process begins by blending a vibrant green sauce made from ginger, garlic, fresh coriander leaves, green chilies, cinnamon, and cloves. To this, yogurt, aromatic spices, and chopped tomatoes are added, creating a rich and tangy marinade that tenderizes the meat and infuses it with deep flavor.

Steps 5-8) Marinate the meat for at least an hour or about 2 to 3 hours and pressure-cook after sauteeing with onions until done. Add a touch of authentic homemade garam masala at the end to enhance the aroma and bring everything together.
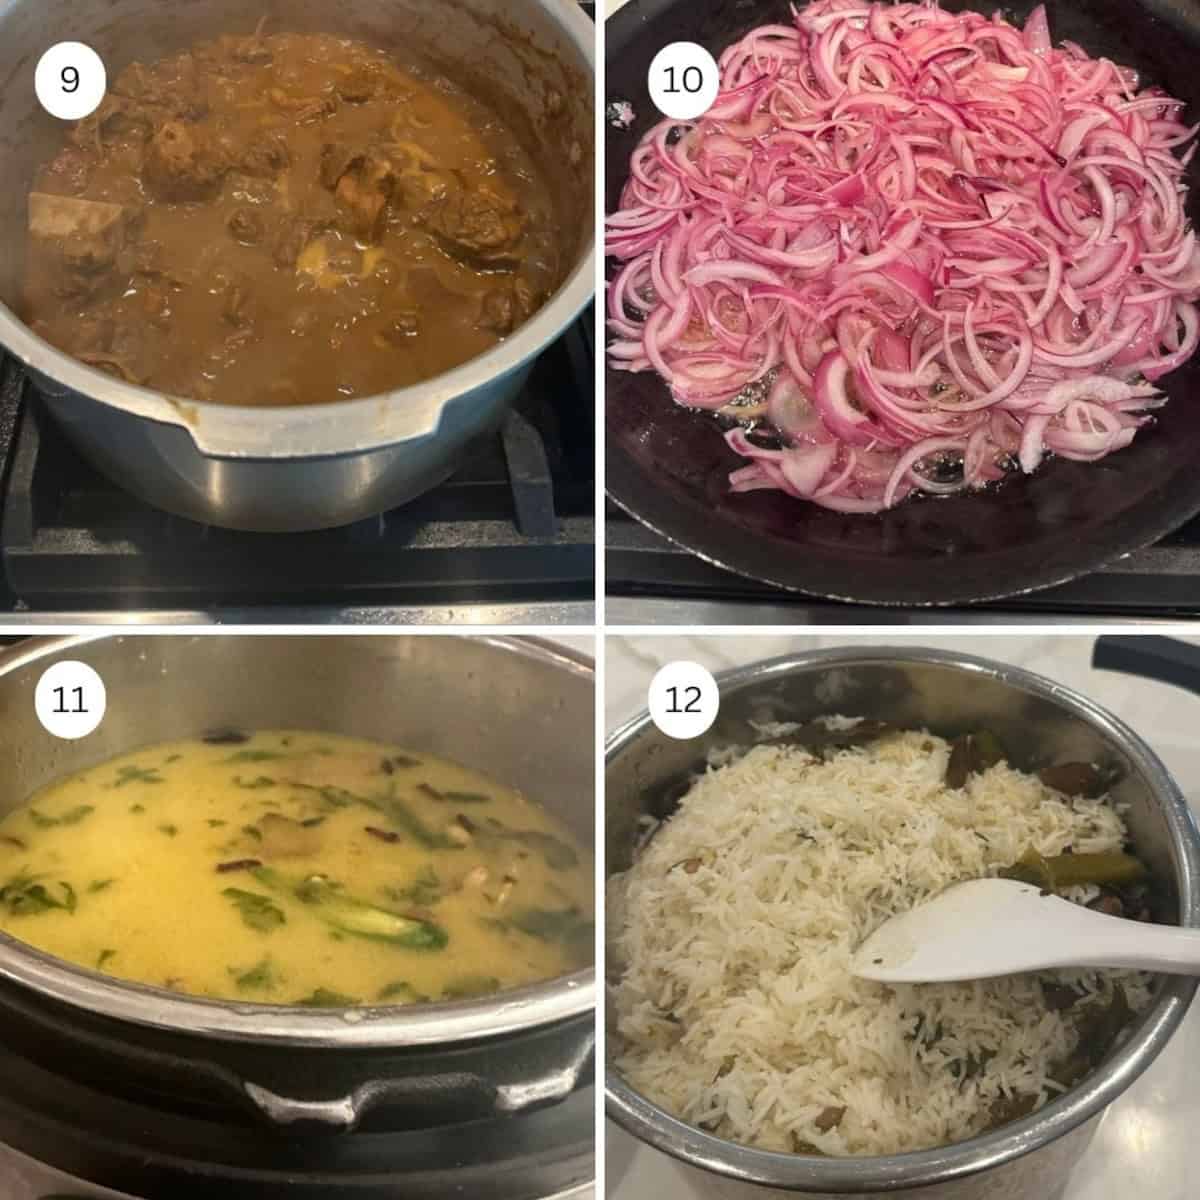
Steps 9 - 12) While the meat is cooking, prepare the garnishes. Slice the onions thinly and fry them in ghee until golden brown and crispy, then set them aside. If you like, you can also fry some nuts and raisins for a touch of richness. For the rice, begin by sautéing it in ghee along with whole spices to infuse it with flavor, then cook until perfectly done, fluffy, and fragrant.
Steps 13-16) Next, the layering process begins. In a heavy-bottomed casserole or biryani pot, start with a layer of rice, followed by a layer of the cooked mutton along with some of its rich gravy. Sprinkle fried onions, nuts, raisins, and a generous handful of chopped coriander and mint leaves. Repeat the layers until all the rice and meat are used, finishing with rice and garnishes on top.
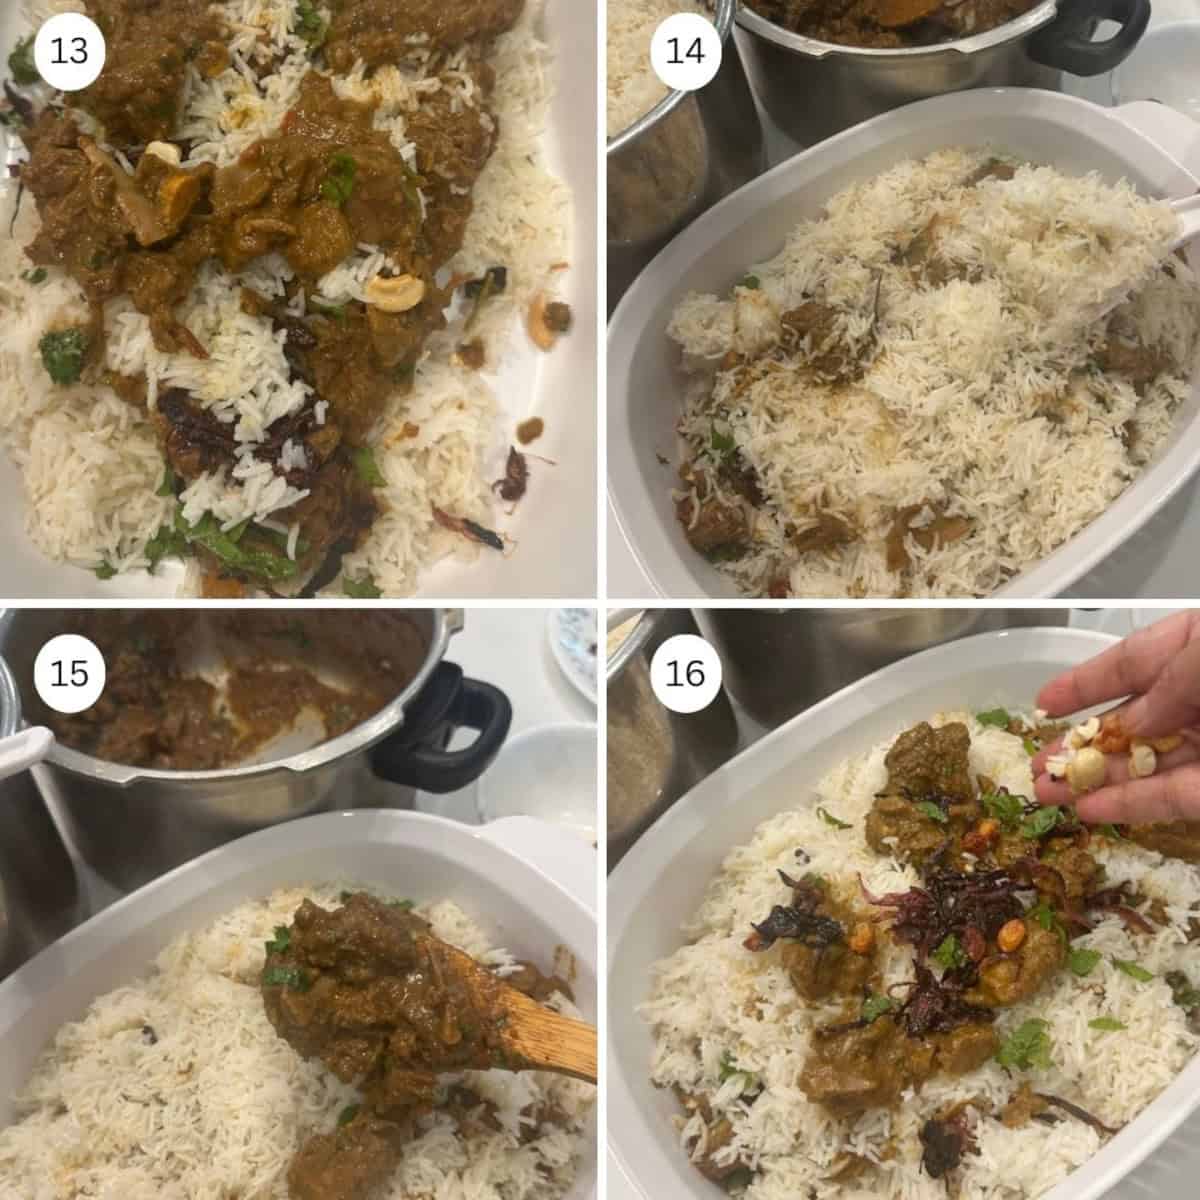
Transfer to a serving dish and enjoy.
Useful Tips
- Frying onions: Sprinkle a little salt over the onions while frying; it helps them cook and brown faster. Keep a close eye on them to prevent them from burning, as even slight overcooking can turn them bitter.
- Rice-to-water ratio: When cooking Basmati rice, use 2 cups of water for the first cup of rice, and 1 cup of water for each additional cup. This helps maintain perfect texture without turning mushy.
- Cooking the mutton: Add only a small amount of water while pressure-cooking the marinated mutton. The marinade already contains moisture, and the goal is to reduce the mixture to a semi-dry consistency before layering.
- Use of ghee: For that authentic biryani flavor, use ghee generously. If you're watching calories, a mix of ghee and oil works too.
- Pressure cooking time: Cook the mutton for 4 to 5 whistles, making sure it's tender but not falling apart. Avoid overcooking or undercooking, as the meat needs to hold its texture during layering.
Recipe FAQ
It is preferable to use Basmati rice in this Biryani. If you want to use the Kaima rice or Jeerakasala rice, do try the Calicut Chicken Biryani.
Using the right amount of water is important. To get the right texture, use 2 cups of water for the first cup of rice, and 1 cup of water for each additional cup.
You can easily keep it for about a week in the refrigerator in an air-tight container.
Although this recipe doesn't require traditional dum (steamed) cooking, you can choose to add this step for deeper flavor. Simply place the layered biryani in a heavy steel or aluminum pot, then set it over a heated tava (griddle) on a low flame for about 10 minutes. This gentle steaming helps the flavors meld beautifully and enhances the overall aroma and texture of the dish.
Related Recipes


If you tried this Mutton Biryani Easy Recipe or any other recipe on my blog, please leave a 🌟 star rating and a 📝 comment below. I love hearing from you!
Mutton Biryani Easy Recipe
Ingredients
For Rice
- 4 cups Basmati Rice
- 4 tsp Ghee or Clarified Butter
- 4 tsp oil
- 3-4 cloves
- 1 inch cinnamon
- 2 bay leaves
- 5-6 cardamoms
- ½ onion diced
- salt
- 5 cups Water
For Mutton Gravy
- 1 ½ pounds mutton
- 3 cups yogurt
- 3 medium tomatoes diced
- 3-4 mint leaves chopped
- 5 tsp coriander powder
- 2 tsp Kashmiri chilly powder
- 1 tsp turmeric powder
- 1 tsp Biryani Masala (optional)
- ½ tsp Garam Masala
- salt to taste
To Grind For Marinade
- 1 inch ginger
- 10 -12 cloves garlic
- 1 bunch coriander leaves
- 4 green chillies
- 1 inch cinnamon
- 4-5 cloves
For Meat Preparation
- 1 onion chopped
- 1 tomato diced
- 1 tsp ginger garlic paste
- ½ lemon
For Garnish
- 2 onion cut into long thin stripes
- 10 cashews
- 10 raisins
- 2 cups ghee for frying
- 1 sprig mint leaves
- 1 cup coriander leaves chopped finally
Instructions
Meat Marination
- Wash the meat thoroughly with salt and lemon and drain water completely
- Grind the ingredients in the "to grind for marinade" section with minimum water to get a green paste
- Add the yogurt, tomatoes, green paste,mint leaves and the spice powders in the "for meat marination" section to the meat
- Mix well and Marinate for about 2 to 3 hours in a referigrator
Rice Preparation and garnishes
- Wash the rice, drain and keep aside
- Heat a thick bottomed pan , add the ghee and oil
- Add the thin sliced onions and fry until crisp golden brown
- Drain and keep aside.
- Add the cashews and raisins ,brown it as well
- Drain and keep aside.
- The thin fried onions, cashews and raisins will be used for garnishing.In the remaining ghee and oil, add the spices under the "For rice" section
- Next add the diced onions and sautée
- After 2 mins add the washed rice
- Fry for about 5 to 7 mins until the rice turns opaque!
- Add the salt and water and cook until done in a rice cooker
- Wait for the steam to be released and rice to be cooled.
Meat Preparation
- Next for the preparation of the meat , take ghee and oil in the pressure cookerried shrimp /fish or salad , Enjoy
- Add onions and sautée it for 10 mins
- Add tomatoes and ginger garlic paste ,sautée for another 5 mins
- Next add the marinated meat and fry it for a while.
- Pressure cook for about 4 or 5 whistles (depending on the meat) until the meat is cooked.
- Once steam is released, check that the meat is cooked well .If the gravy is runny , heat and reduce until you get a thick gravy.
- Add some chopped coriander leaves and squeeze a little lemon.
Layering biryani and garnishing
- Next process is layering of the biryani, transfer the cooked rice into a serving bowl and garnish with fried onions,cashews ,raisins,chopped mint and coriander leaves.
- Then add a layer of the meat gravy and repeat layering with rice, meat and again layer with garnish onions , nuts ,raisins, mint and coriander leaves.
- Gently mix so the gravy is evenly mixed into the rice.
- Squeeze half a lemon if you like (optional).
- Finally garnish with chopped coriander leaves and the remaining garnishes.
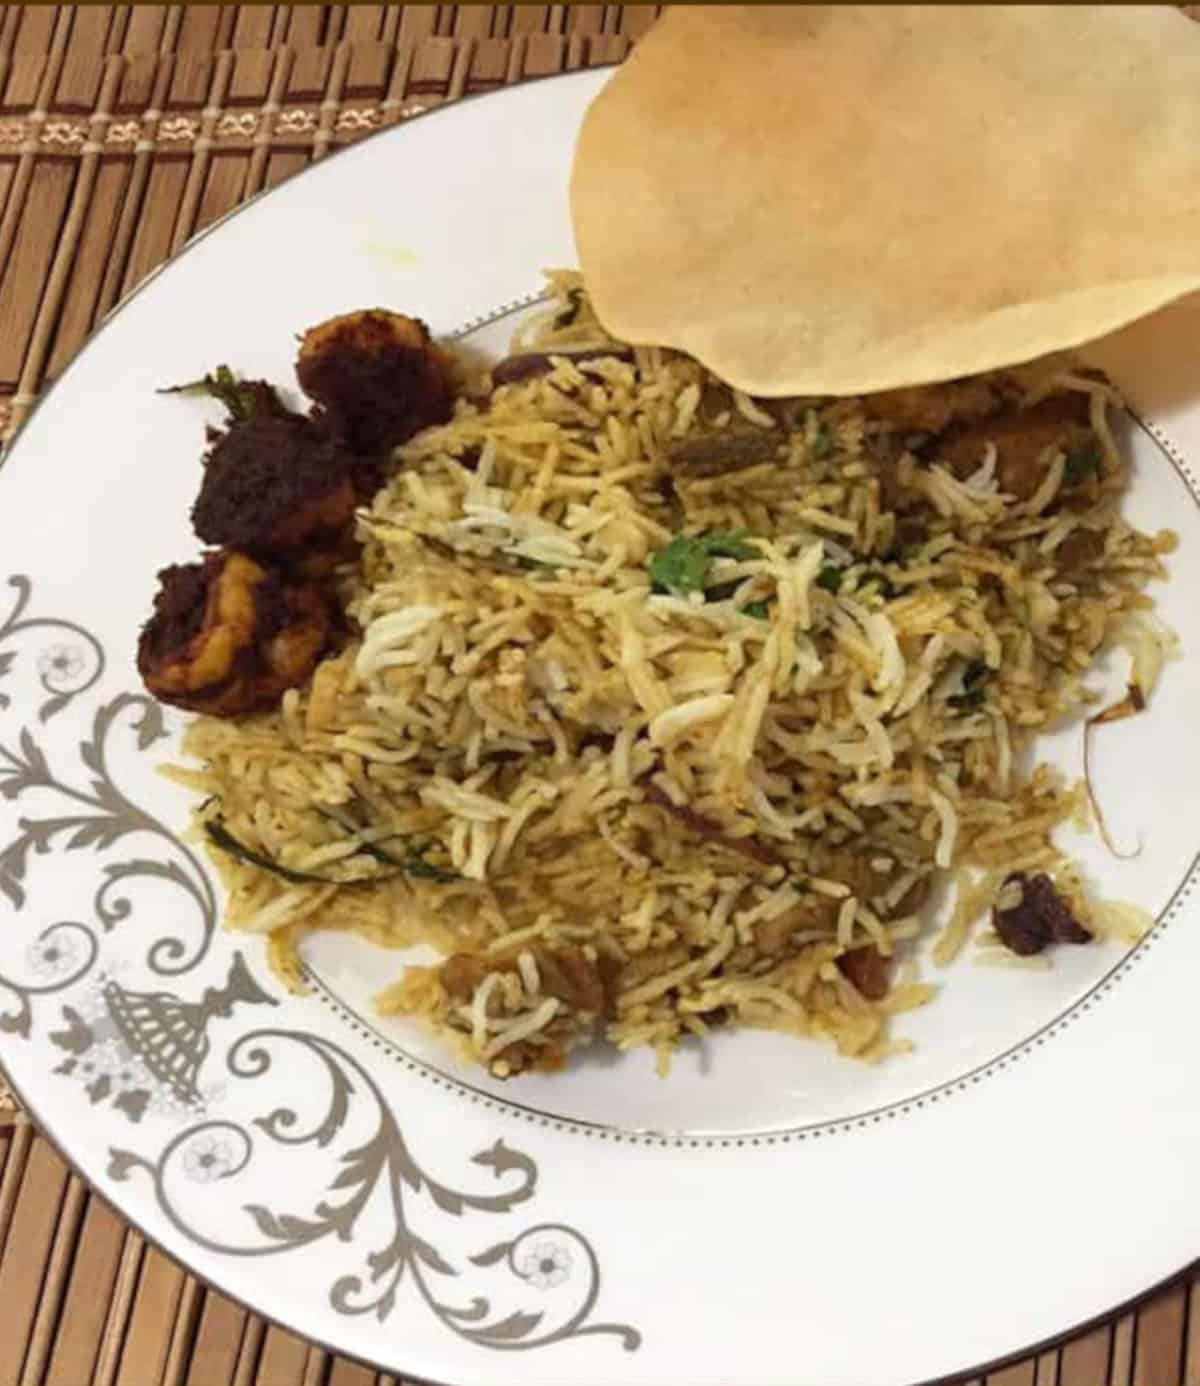
- Mutton Biryani is finally ready !!Serve with Papad (rice fritters) or fried shrimp or fish.
Video
Notes
- Frying onions: Sprinkle a little salt over the onions while frying; it helps them cook and brown faster. Keep a close eye to prevent them from burning, as even slight overcooking can turn them bitter.
- Rice-to-water ratio: When cooking Basmati rice, use 2 cups of water for the first cup of rice, and 1 cup of water for each additional cup. This helps maintain perfect texture without turning mushy.
- Cooking the mutton: Add only a small amount of water while pressure-cooking the marinated mutton. The marinade already contains moisture, and the goal is to reduce the mixture to a semi-dry consistency before layering.
- Use of ghee: For that authentic biryani flavor, use ghee generously. If you're watching calories, a mix of ghee and oil works too.
- Pressure cooking time: Cook the mutton for 4 to 5 whistles, making sure it's tender but not falling apart. Avoid overcooking or undercooking, as the meat needs to hold its texture during layering.
Nutrition


I love biryani and always wondered how to make it. Thanks so much for this fantastic recipe--it turned out great and the instructions were easy to follow!
Mutton biriyani is so delicious I am going to make it again. Thanks for sharing this recipe.
This layered biryani looks like a labor of love! The green marinade sounds so flavorful, and I appreciate the detailed layering instructions. I’m bookmarking this for our next family gathering—it’s got celebration written all over it!
I love biryani and wanted to tackle this recipe. It was delicious! I used lamb since that's what I could find here. It worked great.
This worked exactly as written, thanks!
This turned out so good and will be my new go to mutton biryani recipe!
It is so tempting, but sorry for me, I am a vegetarian. 😐
Thanks for the comment, I will post a vegetarian biryani soon 🙂
Looks great and well explained..
Thank you so much Saumya!